1998 Ford Ranger Rear Brake Diagram
How To: Service Rear Drum Brakes
Changing Drums, Shoes, Hardware and Wheel Cylinder
***DISCLAIMER***
Proceed at your own risk. I am not a licensed mechanic nor do I have any formal training in automotive repair. These instructions are simply a step-by-step reproduction of how I serviced the rear brakes on my Ford Ranger. There may be better ways and methods for completing the repair and maintenance covered by these instructions, but the following has worked well for me.
This was my first time doing the work described in these instructions. I decided to write these instructions to aid anybody else who is considering servicing drum brakes themselves.
***NOTE***
The truck I worked on was a 1996 Ford Ranger with the 10� drum brakes with ABS. Other years may be different. Parts for your truck may differ slightly, especially if you have the 9� drums. Consult your auto parts supplier for proper parts.
*PARTS AND MATERIALS*
1 Set of Brake Shoes ($21.99)
1 Drum Brake Hardware Kit ($6.69)
Brake Grease (~$2)
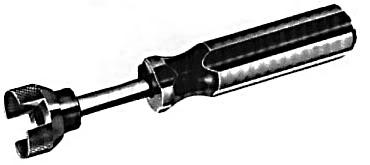
Brake Spring Compressor Tool ($7.99) OPTIONAL
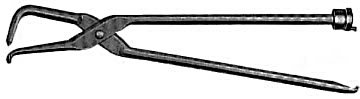
Brake Spring Plier Tool ($7.99) OPTIONAL
2 Sets of Brake Adjuster Hardware Kits - Left and Right (~$10 each) OPTIONAL
Wheel Cylinder ($12.49 each) IF NEEDED
Brake Drum ($38.99 each) IF NEEDED
Brake Cleaner ($3.29)
Prices may differ.
*TOOLS REQUIRED*
Jack
Jack Stands
Appropriate Wrenches to remove wheels
Needle Nose Pliers
Brake Spring Compressor Tool (optional but HIGHLY recommended)
Brake Spring Plier Tool (optional but HIGHLY recommended)
Vise Grips
2 Flat Head Screw Drivers
Catch pan
7/16 Brake Line Wrench (if replacing Wheel Cylinder)
1/2� Wrench/Socket (if replacing Wheel Cylinder)
*******
1. Release the parking brake, loosen the lug nuts on the rear wheels, chock the front wheels, jack the rear axle up and place it on jack stands. Remove the rear wheels.
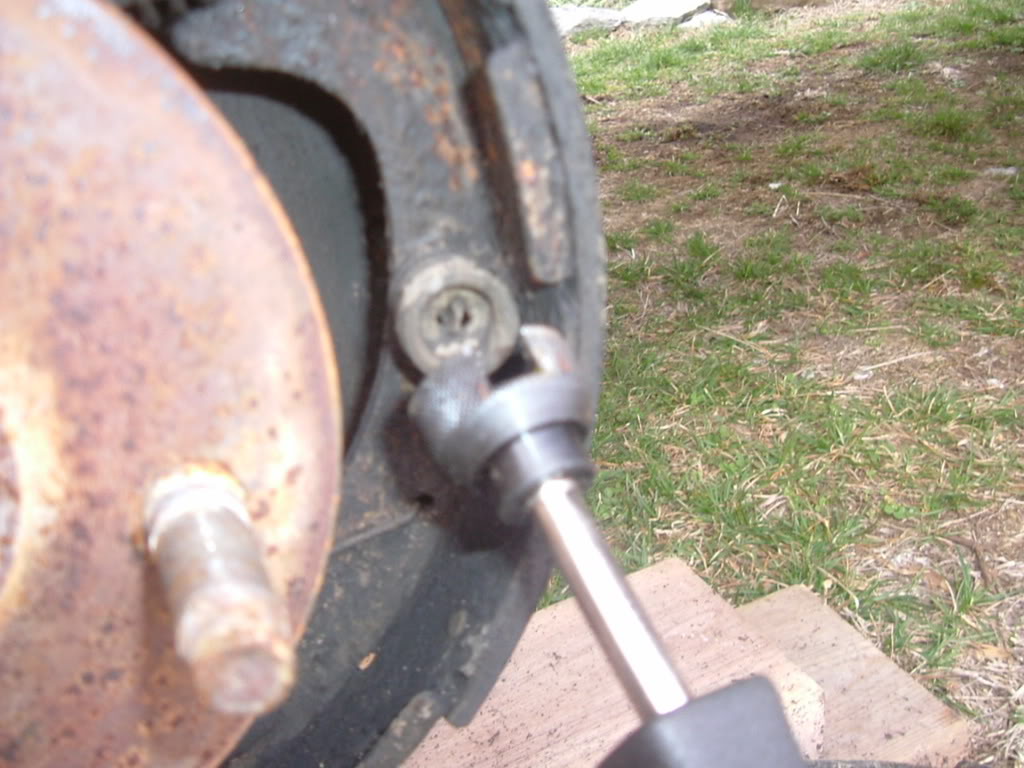
2. Remove the drums. If they do not slide off you will have to retract the shoes. On the back side of the brake backing plate you will see a rectangular rubber plug near the bottom. Remove the plug and shine a light through the hole. You will see a wheel with teeth. Insert a flat head screw driver and rotate that wheel UP to retract the shoes.
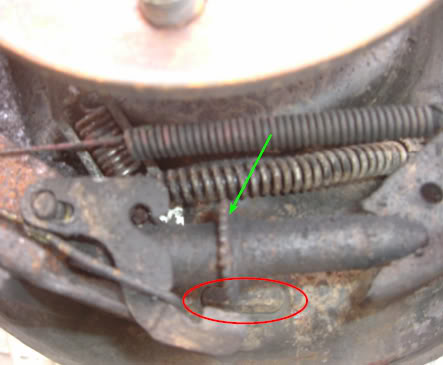
This photo shows, from the inside, what you will be doing to retract the shoes. Circled in red is the rubber plug that needs to be removed. The green arrow shows the adjusting wheel. If the adjusting wheel does not turn, you may need to insert a second screw driver and depress the adjuster (the pivoting metal piece partially circled in red).
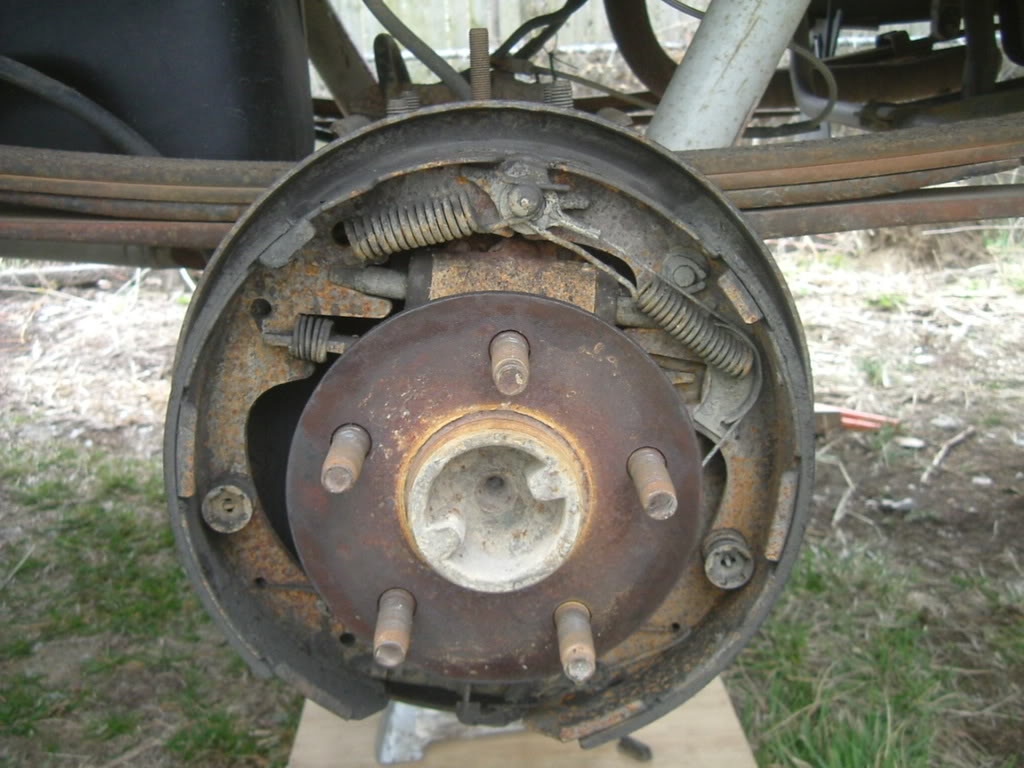
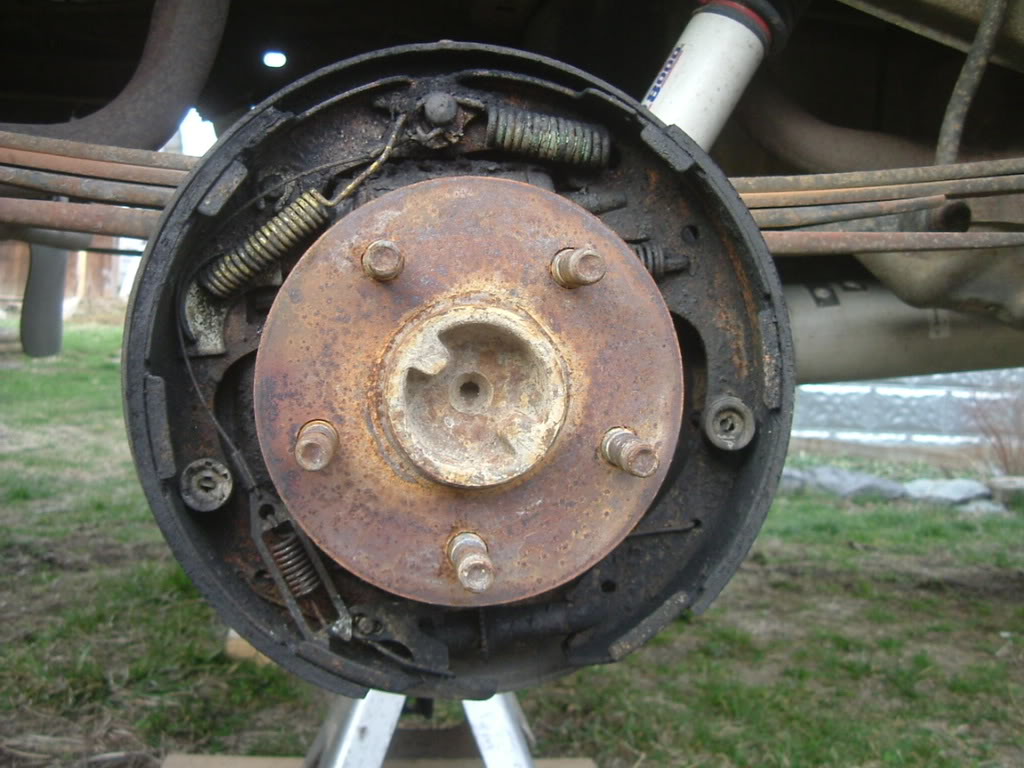
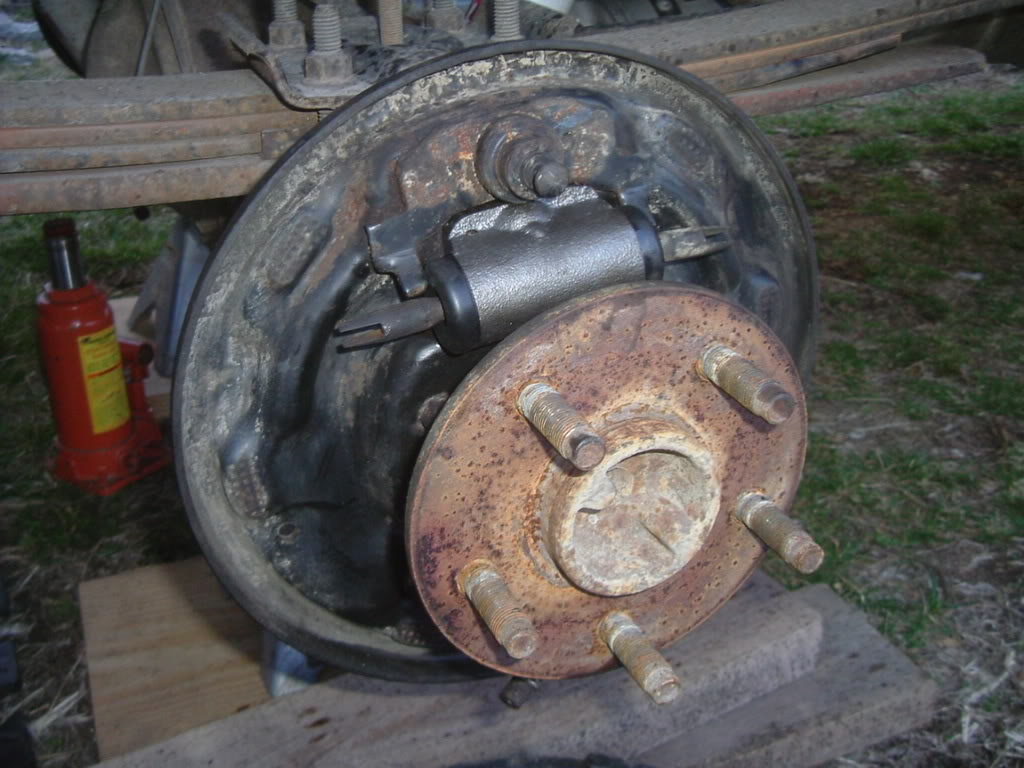
3. With the drums removed, you should see this:
Hopefully you will not see this:
Put both drums aside. You will need to work on one side at a time and use the other side as reference.
4. Place the catch pan under the brake assembly and liberally spray the brakes with brake cleaner. Let air dry.
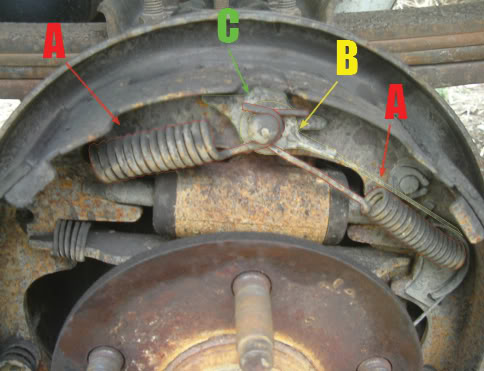
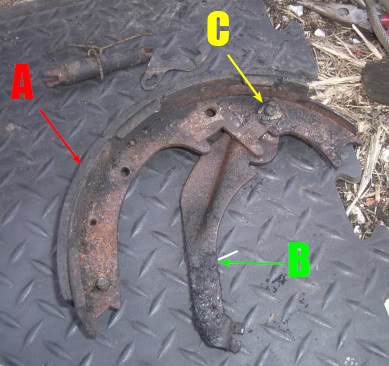
5. Remove the Shoe Retracting Springs (A), the Adjusting Cable eye (B) and the Anchor Pin Plate (C). If you bought the hardware kit, the springs can be disposed but keep the adjusting cable and anchor plate.
Remove the Parking Brake Strut (the metal bar just below the Wheel Cylinder with a spring on one end).
6. Now the Shoe Retaining Springs and Pins need to be removed. There is one per shoe. These can be discarded if you purchased the hardware kit.
7. Remove the Adjusting Screw (A), the Adjusting Cable (if it was not completely removed in step 5) (B), the Lower Spring (C), and the Adjusting Pawl and Spring (D). The Lower Spring can be discarded if you purchased the hardware kit.

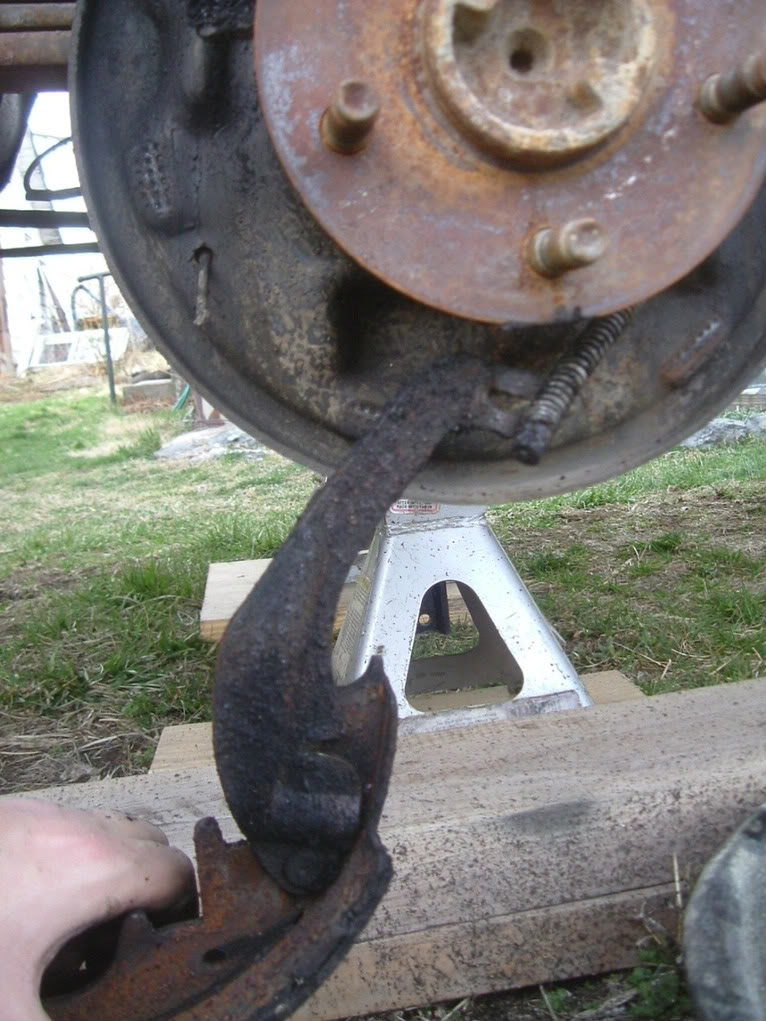
The Primary Shoe should be completely free - remove it. The Secondary Shoe will still be attached to the Parking Brake Cable via the Actuating Lever. Separate them.
8. Everything except the Wheel Cylinder should now be removed from the brake backing plate. Now is a good time to spray down the brake with brake cleaner one more time. Let it air dry, then clean it thoroughly with a rag. Spray it again if necessary.
This is also a good time to take all the hardware and parts that will be reused and clean them thoroughly. I would suggest putting all the parts to be discarded off to the side but do not discard them yet - just in case you need to reuse something.
This is a good time to replace the Wheel Cylinder if you need to. If not, skip ahead to step 9.
WC1. If your brake looks like this:
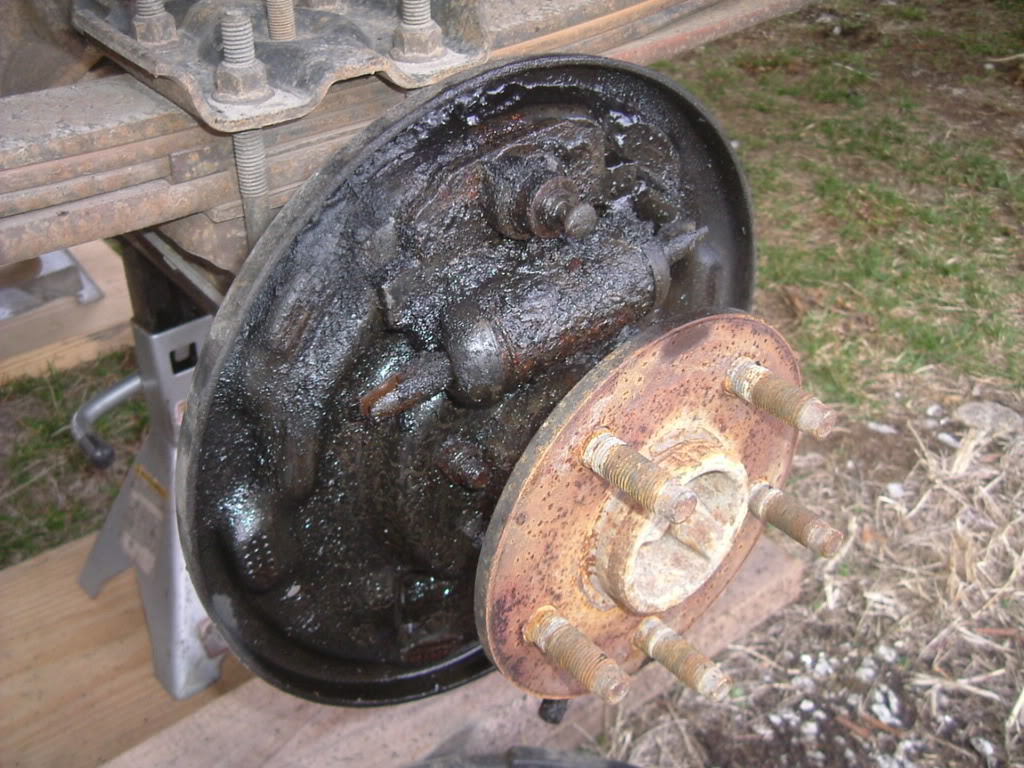
You DEFINITELY need to replace the Wheel Cylinder (referred to as WC from here on out). If you are not sure if the WC needs to be replaced, carefully pull back on the rubber seals. If brake fluid escapes, you should replace or overhaul the WC.
WC2. The WC is held on by two bolts and the brake line that go through the brake backing plate. Use a 7/16� brake wrench to loosen the brake line. Use a 1/2� wrench or ratchet to loosen the two bolts. If they are on too tight, spray the area with penetrating oil like PB Blaster. Now would be a good time to start cleaning the parts while the oil soaks in.
WC3. Remove the brake line fitting - it does not need to be pulled back from the WC. Remove the two bolts.
WC4. Pull the old WC out and clean the mating surface before installing the new WC. Place the new WC in the slot, install the two bolts, and then install the brake line. These need to be tightened down pretty good. Now is also a good time to loosen the bleed valve to make bleeding the brake easier.
It should now look like this:
9. At your work bench, remove the retaining clip (C) that holds the Secondary Brake Shoe (A) and the Parking Brake Actuating Lever (B) together. I found it very difficult to remove without destroying it. You should have a new one in your hardware kit, but my kit came with only one new retaining clip but an extra shoe retaining clip.
The old Brake Shoe can be discarded but we will be reusing the Actuating Lever.
10. Install the Actuating Lever and retaining clip on the new brake shoe. Then install the Parking Brake Cable to the Actuating Lever making sure it is installed the correct way (use the other brake as reference). Let the brake shoe and lever hang down for now.
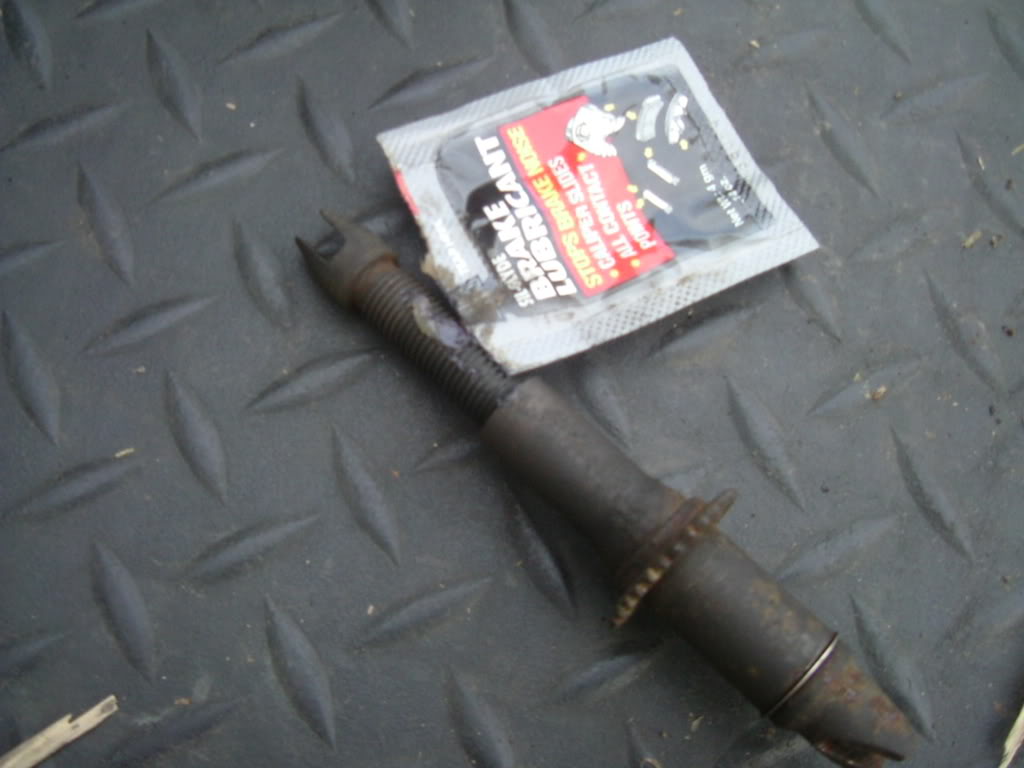
11. Apply Brake Grease to the shoe backing plates. Make sure you get all of them.

Lubricate the threads of the threads of the Adjusting Screw with brake grease.
12. Refer to this Photo for the installation steps:

Position the shoes, one at a time, on the backing plate. Insert the Shoe Retaining Pin from the back of the backing plate all the way through the shoe. Place a Retaining Spring over the pin, then use the Brake Spring Compressor Tool to install the Retaining Spring Cap (see the photo from step 6). This step can be very difficult by yourself because the brake shoe may not want to stay put while you try to install the retaining clip. Although not strictly necessary, I had a MUCH easier time performing this step with the brake spring tool. (PHOTO - A)
13. Install the parking brake strut with one end in the slot in the primary shoe and the other end in the Actuating Lever - not the Secondary Shoe. Use the other brake for reference.
Make sure the Wheel Cylinder pushrods are in the proper slots in the brake shoes. (PHOTO - B)
14. Install the Adjusting Screw into the bottom of the Shoes in its appropriate slots. The long end of the screw should be facing the front of the vehicle (PHOTO - C). Install the Adjusting Pawl and spring (PHOTO - D) and then the lower Spring (PHOTO - E).
15. Now for the top of the brake. Install the Anchor Pin Plate (PHOTO - G) and the Cable Guide (PHOTO - F). The cable guide should fit flush against the shoe. One of mine did but the other one took a little filing to get it to seat properly.
Install the eye of the Adjusting Cable (PHOTO - H).
16. Install the Shoe Retracting Springs (PHOTOS - I & J). This is where the Spring Pliers really come in handy. Slip the hooked jaw of the plier over the spring hook and place the end of the other jaw in a hole on the top of the opposite brake shoe. Then squeeze the plier handles together and the spring should easily slip over the stud. This method is so much easier than trying to strong arm the springs into place using vice grips.
17. Finally, route the Adjusting Cable around the cable guide and connect the hook at the end to the Adjusting Pawl. The hook should attach from behind the Pawl, not over top of it. You can lift the pawl up to make installation easy.
18. Make sure everything is seated correctly including the Wheel Cylinder pushrods, Parking Brake Strut, and Adjusting Screw.
19. If you have new drums, install them. If you are reusing your old drums, either have them resurfaced or at least scrub any hard spots with fine emory cloth.
20. From behind the brake, use your screw driver to push DOWN on the adjusting screw until the shoes come into contact with the drum, then back the screw off. If you installed a new Wheel Cylinder, now is a good time to bleed the brake. Remember to top off the brake fluid. The brakes should self adjust when you apply the brakes while going in reverse.
21. Now repeat for the other side!
*******
I decided to take pictures after getting one side done. Unfortunately, I was in a rush to get the second side done so I don't have more detailed pictures. I hope this will still be a valuable step-by-step instruction for people like me who never tackled rear brakes before.
Posted by: sheenafrutos.blogspot.com
Source: https://www.ranger-forums.com/engine-drivetrain-122/how-servicing-rear-drum-brakes-81906/